Autodesk Article

Hands-on with Design Thinking: Solution Phase

This article is part of a series. Solution is #5 of 5.

RONSEN_BLOG_SOLUTION.pdf+-+Adobe+Acrobat+Pro+DC.jpg

In this series, Michele Ronsen of Ronsen Consulting explores Design Thinking through blogs and activities. Before reading the article below, check out the first four blogs in the series, which cover the Understand, Explore, Prototype, and Refine phases of Design Thinking.

Welcome to the fifth and final blog article about Autodesk’s five-step Design Thinking Process: Solution. This is where you present your final work. Doing this well is just as valuable as producing outstanding work, if not even more so. It’s paramount that you do not underestimate the importance of this final deliverable. In fact, work that’s presented thoroughly and expertly will often outshine work that isn’t as well done. Why? Several reasons:

  • A successful presentation will bring people together and encourage rich dialog and deep connection.

  • Shared experience is greater than any individual experience and possesses the power to align disparate views and gives the opportunity to progress those views with a unified vision.

  • Presenting your recommendation is sometimes your last opportunity to influence your audience’s beliefs and behaviors.

While these are benefits for both you and the audience you’re presenting to, keep in mind that building your final presentation is also a chance for you to step back, review your own process; identify, document and demonstrate how you arrived at your recommendation. These are critical steps to building out the project for inclusion in your portfolio; this work also can live on ad infinitum as a case study for your own design thinking process.

We’re going to apply the Solution phase to an actual project. The assignments that correspond to this blog article are tied to the Disaster Relief project. In this challenge, you will design a disaster relief shelter that's strong enough to withstand the elements—and gives real-world comfort to people in a time of crisis—using Revit, a building design software specifically built for Building Information Modeling (BIM), including features for architectural design, MEP and structural engineering, and construction.

As with the first four steps in this series—Understand, Explore, Prototype, Refine—in this phase, we have three levels of assignments to complement this challenge. Beginners will build an easy to assemble disaster shelter. Inter- mediates will create a transitional family shelter from local materials. Advanced practitioners will design a durable family shelter to withstand natural disasters.

DesignThinking_Icon.png

Let’s revisit the first four steps of Autodesk’s Design Thinking Process and apply them to building and delivering a great presentation simultaneously. With this project, we’ll be looking at designing disaster relief shelters   using the full five-step process. What you’ll see in this final step, is that the Solution and its presentation circle back and leverage the first four steps again. Let’s dig a little more into that.

Understand

We know Understanding is about your audience. Understanding the people you’re presenting to is an essential first step in crafting your final solution. In your presentation, you’ll identify your audience’s wants and needs in order to prepare and frame it properly.

As you know, Understand is the most foundational and important phase of this methodology. Design thinking does not start with a problem or a solution. It is implementing this preliminary step that truly differentiates design thinking from a traditional design approach. Apply it to building your presentation as well. The audience that you’re presenting to may be different than the people you initially interviewed to learn about needs and wants. It may be those people, but it’s most likely leadership and stakeholders, the people who will decide whether or not to implement the solution you’ve designed.

There are both passive and active methods to support Understanding that apply to Solution. You could leverage passive methods by looking at presentations and portfolios from industries, companies and thought leaders you want to work with. Their presentations probably got them an impression that earned them their role. Google their names, look for work posted to their LinkedIn profiles, on personal and corporate websites, blogs, Pinterest, and more. Take note of how these leaders are presenting their work, the formats they use, what you like and don't like about it and what’s similar. Also look for gaps where you can stand out.

You might leverage active methods, asking your audience about their presentation preferences and expectations. Find out about the software and technology available to them, the room you will be presenting in, and their presentation culture and tone. Identify and confirm the goals including which messages and components are most important to cover. Determine if they have a data-driven or a storytelling culture. Find out if they are visual or literal, if your presentation will be in-person or conducted remotely via Skype, GoToMeeting, Slack, or a combination; how much time you have to present, and other pertinent details. Understanding these audience specifics and the nature of the physical, digital, and analog structure will help you define the best strategy for communicating each message, as well as the best channel(s) and disciplines to use.

Explore

Explore your key messages, variations on how to present them, and the formats/channels that will resonate with your audience the most. Generate a wide range of ideas on how you might meet their needs. Consider which approach- es will best communicate your solution and meet the established presentation goals. Make sure to take into account the time you have to prepare for the presentation and be realistic about your bandwidth and skillset.

Some formats to consider may include a slideshow, video, 3D prototype, Pecha Kucha rapid approach, a combination of these, and/or something more unique such as a role-playing experience comparing before and after scenarios. Generate a range of messaging, design and format ideas.

Weigh the complexity of your desired approach against the time you think you will need to develop the presentation and the supporting components. Then triple the hours you think it will require. Before you make a final decision, ask yourself if you honestly have the time and skills to not only pull it off but to blow it out of the water! Be extremely honest with yourself before you embark on your chosen direction.

RONSEN_BLOG_SOLUTION.pdf - Adobe Acrobat Pro DC.jpg

Prototype

Prototype your presentation. This is about turning your presentation ideas into form in order to validate the approach. It’s about gathering your thoughts, key messages and other materials into a usable state in the format(s) you’ve chosen to pursue. It includes practicing your  presentation,  within  the timeframe  allotted,  using  the  aids you’ve created, and soliciting feedback from others on the individual components and collective presentation experience. The desired result is to provide you a sense of the whole presentation in order to gather constructive and timely feedback to improve it well before the deadline. Practice is an absolute. Plan to rehearse your presentation several times before performing it for others to comment. Make sure you save each version of your work in multiple formats just in case!

Here are some sample questions to consider as you build your interview protocol:

Front-loading

  • What do you think the goals of this presentation are?

  • Do you think this format/channel is the most appropriate for the audience? 

Evaluating

  • Are all of the graphics related to the topic? Are they all needed?

  • Which graphics make it easier to understand the presentation and support my conclusions Which don't?

  • What are the three weakest aspects of the presentation?

  • What are the three strongest aspects of the presentation?

  • How sequential and logical was the presentation?

  • What could make this a higher quality presentation?

  • Does the presentation utilize available technology effectively?

  • Did I speak too quickly or softly?

Reflection

  • How engaged did you feel in the presentation?

  • How effectively does the presentation convey the meaning and purpose?

  • What is the most important component for me to address in order to improve the presentation?

  • Do you think this format/channel is the most appropriate for the audience?

  • How effective was the presentation?

Make sure to record your interviews. When you are soliciting feedback take note of all of the questions people ask as well. Anticipate your audience asking you these questions during your presentation so you can prepare answers to them before delivering your final. 

Refine

Refine your presentation approach, key messages, format and any other artifacts to ensure they are meeting the presentation’s goals. Make sure you have previous versions backed up in multiple formats… just in case! Take a fresh look at your highest fidelity presentation and artifacts, review them, and note the following: 

  • How well the criteria is met

  • If the timeframe allotted matches the time needed

  • How much time is left before delivery for additional refinement

Remember, the goals may have morphed through the process, or it’s possible that you may have departed from the destination accidentally, or you might be running out of time. It happens to the best of us! Be brutally honest with yourself and your abilities too. Did you learn that you are not comfortable speaking in front of a large audience?

Consider recording your presentation’s audio ahead of time. Did you learn that a 3D prototype resonated more than the static detailed rendering? Contemplate diverting more effort into that than another aspect. Refine your approach accordingly and continue to rehearse. 

Solution

Solution is the final and last phase in the process. By this point, you’ve practiced each of the previous steps, invested lots of time in your design challenge, understand the importance of presenting your work well and engaging with your audience, and rehearsed and revised your presentation several times. You’ve also applied Design Thinking to multiple disciplines and seen how the approach can be applied to a variety of challenges and situations. 

Here we are at Solution. This is your final opportunity to shine, show your wares and influence your audience. This is where the rubber hits the road! Go get ‘em! Don't forget to: 

  1. Gather all of your final materials the night before (digital and analog)

  2. Save and bring them with you in multiple formats (just in case!)

  3. Review and iron out any last minute logistics (transportation, technology, etc.)

  4. Dress for success

  5. Get a good night’s sleep 

The day of the final presentation, plan to arrive at least half an hour before your meeting time. During your presentation smile, speak clearly, make frequent eye contact and do not read from your slides or notes. Try to connect with your audience, explain how you’ve solved the challenge succinctly, ask for feedback, and thank them for attending.

RONSEN_BLOG_SOLUTION.pdf - Adobe Acrobat Pro DC.jpg

After the presentation, write down what worked well, what didn’t, and what you would change if you have another opportunity to present the same work. Then make a separate note about how to best incorporate this work into your portfolio while it’s fresh in your mind. Last but not least, share your work on Autodesk Design Academy here.

I hope you’ve enjoyed this entire blog series and all of the related assignments on Autodesk’s Design Thinking Process. I commend you for taking the initiative to learn the new skills required to excel as a designer today.

In true Design Thinking spirit, we welcome your thoughts on how we can improve this series, what we can add to it or clarify, and how we can make it more meaningful to educators and students like yourself. Please share your feedback by emailing designacademy@autodesk.com.

Test your complete set of Design Thinking skills with this activity.

Hands-on with Design Thinking: Refine Phase

This article is part of a series. Refine is #4 of 5.

RONSEN_BLOG_REFINE.pdf - Adobe Acrobat Pro DC.jpg

In this series, Michele Ronsen of Ronsen Consulting explores Design Thinking through blogs and activities. Before reading the article below, check out the first three blogs in the series, which cover the Understand and Explore, and Prototype phases of Design Thinking.

Building a Design Thinking skillset is a practiced process. By the time you’ve completed the first three steps in Autodesk’s Design Thinking process—Understand, Explore, Prototype, Refine, and Solve—you may also have un- knowingly traveled down a path, or multiple paths, that deviated from established criteria in one way or another. While the premise of user-centered design is to include the user every step of the way, it’s plausible that new findings, stakeholders, budget, technology or something within your control has inadvertently modified the direction. This is where Refine comes in—the second to last step in Autodesk’s Design Thinking process.

DesignThinking_Icon.png

We’ve already covered Understanding—the step in which we learn how to uncover and grasp wants and needs through practices of empathy. In Exploring, we took strides to define for whom we are designing, what success looks like and then generating ranges of solutions to meet needs. In Prototyping, we reviewed testing, learning, and iterating to validate those proposed solutions.

In the next phase, Refine, we revisit the original design challenge and its success criteria to ensure our solutions are meeting set goals. Here, we take a fresh look at our highest fidelity prototype, review it, and take stock of how it meets the original and possibly revised goals. Remember, these goals may have morphed through the process, or it’s possible that you may have departed from the destination accidentally.

RONSEN_BLOG_REFINE.pdf - Adobe Acrobat Pro DC.jpg

We shouldn’t discount that this can be frustrating; it’s actually helpful to recognize this as part of the process. Deviations are quite common in professional practice for several reasons. Revised success criteria may be out of our control. For example, imagine a new stakeholder was introduced from the client side, and she brings a new mandate to the challenge: a competitor launched a similar solution in the time you were developing yours. Perhaps a new law was passed that impacts your strategy. There are also times when the departure from the path to meet our goals is within our control, which can sometimes be summed up as “tunnel vision”: the inability to see beyond our personal point of focus. Or perhaps we actually saw this departure and chose to ignore it based on perceived low impact.

Sometimes these deviations are unavoidable, and sometimes they aren’t. Regardless, it’s important to go through this exercise of refinement—a procedural gut check, if you will—to validate the design solution against goals.

To do this, we must dissect our solutions at both a detailed, granular level as well as from a thousand foot high-level view. Compare your criteria checklists (the challenges involved mandates combined with the users’ needs, wants and feedback) to the current state of your solution and scrutinize the work. Ask yourself how you are doing within these contexts and perspectives and take stock of what and how your design could benefit from further evolution. Be critical. After all, we’ve moved quickly, our eyes and ears are tired, and we’ve absorbed a ton of information. It’s very likely that something has changed along the way that was out of our control and we missed that new requirement, or we've acquired a narrow-minded or limited perspective. It happens to the best of us!

Building a Design Thinking skillset may seem daunting and tiring at times. The truth is that it can be taxing, regard- less of how long you’ve been practicing. The key is to keep your eyes on the prize. The genuine reward comes when you can meet your users’ needs while simultaneously furthering your skillset. Now is not the time to give up! Refining is an instrumental step. If you avoid revisiting your ideas versus the success criteria and the refinement that follows, you may have significant regrets. Why? Because if you don’t find the holes in your solutions, the people you’re designing for will.

Here are three suggestions on how to refine your design.

  1. First, consider removing elements in isolation. Does everything have a value? Does everything stand up? These could be the application of color, materials used, shape, steps or anything in this vein. What can be eliminated to make your solution simpler? An extra step in a setup flow might cause drop-off. Is there anything that might be considered fluff or gratuitous? An animation might be delightful but might not work on a lower grade device. Be ruthless in your choices; the best experiences are focused, easy to understand and use.

  2. Second, identify your earlier assumptions from exploring and challenge them. Then challenge them again (you remember this part!). List what you know now that you didn't know when you started. Question what you believed to be true at the onset and compare it to what you learned as you journeyed on. What should be tweaked as a result of these deltas? Naturally, you’ve both followed your instincts and held to a process; these led you down your current path. Perhaps you conducted a persuasive interview while in the understanding phase. Perhaps this perspective turned out to be an outlier, and the general need pointed in another direction. Does your solution still cling to this outlier? Now is the time to do your checks and balances.

  3. Third, recall the person or people who provided the most positive feedback. Recall the person or people who provided the most negative feedback. Read your interview notes again and think about how they might respond to your solution in its current state. Then conduct additional interviews to solicit feedback. Reach out to the person or people you wished you had spoken to but didn’t. Use these refreshers as an opportunity to show refined prototypes. And guess what? You may just need to iterate again. It’s all part of the process.

Now, let’s dive into refining.

Here are some exercises that will help you hone your Refine skills. These assignments, together with the Autodesk Design Academy’s Green Space: Urban Planning project can be applied to any design challenge.

The Green Space project features architect and urban planner Riyad Ghannam who challenges you to trans- form a grungy curb into a street-side minipark using AutoCAD. He’ll walk you through the process and explain the design criteria. Use this project’s assignment exercises, as well as the homework assignments to further your own Design Thinking process. Use them as resources to integrate design thinking as a framework in your studies and apply them to any project you choose.

Ready for the final step? Read about the Solution phase of Design Thinking.

Hands-on with Design Thinking: Prototype Phase

This article is part of a series. Prototype is #3 of 5.

RONSEN_BLOG_PROTOTYPE.pdf - Adobe Acrobat Pro DC.jpg

In this series, Michele Ronsen of Ronsen Consulting explores Design Thinking through blogs and activities. Before reading the article below, check out the first two blogs in the series, which cover the Understand and Explore phases of Design Thinking.

Welcome to part three in this series about the five steps of Autodesk’s User-Centered Design and Design thinking process—Understand, Explore, Prototype, Refine, and Solve. It includes several homework assignments for students of various levels and encourages hands-on practice. We’ve been articulating these steps because of the drastic changes in the design industry over the past few decades that have a profound impact on how we as designers define our processes, and how we as educators are helping to shape both these processes and the students who apply them.

DesignThinking_Icon.png

I was a student too. My formal education was twenty years ago, a time when design could be summed up by the aesthetics of type, form, and material. For years, I studied, critiqued, created and questioned the design of various “things.” It was physical. “Experience” wasn’t yet part of the lexicon, but I sought just that: experience. Allow me to share a personal one.

After college, I ventured to Alaska on an Outward Bound trip—a wilderness adventure—that was both challenging and enlightening. I had never been to Alaska, or mountaineered for that matter, and I knew no one in my group. As the story goes, we all became quite close despite being from different walks of life.

We were exposed to what sometimes felt like dire circumstances, and we worked together to support each other and not only get through our journey, but relish even the biggest challenges.

We all learned a lot. We watched each other. I watched how my new friends organized their packs. I watched how they dried their wet clothes. I listened to their stories and they to mine. We asked each other a lot of questions. I tried to mimic many of their behaviors so I could be more proficient in my tasks and abilities. What if I used a walking stick like Sam? What height should it be? What if I wrapped the handle like a tent pole? What side should I hold it on?

By observing, asking myself questions, and trying things out, I learned about how to approach and interact with my group, nature, weather, gear, and even myself.

Years later I recognized this trip was my introduction into experience design. Experience design observes critical insights of design thinking, specifically in regards to immersion and empathy. It was also my first foray into rapid prototyping. What I enjoyed so much about this trip is also what I relish about being a design thinker: under- standing, exploring, and trying and making new things (or prototyping). After all, design thinking is a journey in itself and these actions are an important part of both the design process and one’s individual growth process.

Let’s quickly review the first two steps Autodesk’s User-Centered Design and Design thinking.

  • The first step, Understand, means putting people first so we can learn about their needs and expose problems we can solve through design.

  • The second step, Explore, is about defining whom you are designing for, what success looks like and generating a wide range of ideas on how we might meet people’s needs.

Now we move on to Prototyping. This is about turning an idea into form in order to validate concepts. It’s much like putting together a rough menu for a dinner party before going to the grocery store or mapping and evaluating different forms of transportation before heading to a first day of work.

RONSEN_BLOG_PROTOTYPE.pdf - Adobe Acrobat Pro DC.jpg

Prototyping is about getting things at size and scale and in a usable state. This allows us to not only garner feedback on the individual components or requirements but also determine how they all work together as an experience.

With prototypes, we can easily communicate the size, features, functionality, and other key intents. The desired result is to give us a sense of the whole in order to gather constructive and timely feedback so that we might invest learnings back into product or service improvements.

Storyboarding and concept sketching are early phases of prototyping and can help build foundations for basic products. Sketching is another effective way to communicate these ideas. When prototyping, form factors don’t always have to be complex or expensive! Depending on the type of design, anything from paper or cardboard to 2 or 3-dimensional software might serve as your tools.

Let me use the walking stick from earlier as an example. By observing my companions use various types of support (wood, metal, with or without wrist straps, use of one or two poles), and discussing their experiences, I learned which features were applicable to which terrain and which brought the most support and comfort. They also had draw- backs. Some reduced the impact on my leg joints and muscles but made my arms terribly sore. If I held the poles, I couldn’t do other things like snacking or map reading. Using two poles helped my blood circulate more evenly and kept me warmer but made me clumsy. The metal ones often made clinking noises.

Once I understood and explored the features I might tweak, I set out to make my own walking stick. The primary goal was to increase my balance and more easily navigate the terrain by enhancing my mobility without increasing my impact on the environment. My non-goals were to provide protection from bears, act as a crutch or make a fashion statement. I identified both sets of goals as I began my design.

The first prototype was made from a found piece of wood and a grip and wrist strap made from duct tape and a tin foil basket. It took about ten minutes to create. After a quick trial, I asked others to try it. The grip was too big for me, so I made it smaller. The tin foil wasn't strong enough so someone suggested the top of a plastic deli container instead. It worked. It wasn’t pretty, but that wasn’t an established goal! The bottom of the wood pole was unfinished causing it to snag, so I whittled it down and that reduced catching. My revisions took about fifteen minutes.

Now ten to fifteen minutes isn’t a lot of time, but working at a quick and iterative pace is helpful for a few reasons. It ensures we don’t get bogged down in the details and requires staying at a high level. Second, it allows us to develop more than one rapid prototype so that we can compare them and analyze the different results. It also protects us from getting too attached to one iteration in particular, which is often a byproduct of spending too much time on one version.

I continued to flesh out my concept while continually getting input for the duration of the trip. As I prototyped iteratively, my versions became more refined. This is important because as we learn and discover, higher and higher fidelity prototypes bring us closer to our intended solution.

It’s worth mentioning that regardless of fidelity, don’t be afraid to share prototypes to get feedback. Your own thoughts and assessments only become valuable when complimented and compounded with the thoughts and assessments of other people. Ask yourself and others, especially your stakeholders, what’s missing and what could be better. You can always prioritize feedback into buckets like “must have” and “nice to have.” Establish your goals and non-goals. Take all the feedback you can get, and much like with other phases, remove your biases and assumptions. Repeatedly source, analyze, and synthesize feedback through improved prototypes.

RONSEN_BLOG_PROTOTYPE.pdf - Adobe Acrobat Pro DC.jpg

Today there are a plethora of tools to facilitate prototyping. For product development, Fusion 360 is an excellent cloud-based 3D modeling platform. Perhaps my experience with my walking stick would have been different if this software had been created at the time! The possibilities of creating a 3D model from a sketch, applying different materials, generating a rendered model let along cloud base design collaboration and 3D printing! I would have opened a new business!

An idea that’s been thoroughly prototyped and tested will almost always yield more successful results in the end. Why? We’re able to identify what aspects need to be considered further, we understand expectations and gaps, and we have the opportunity to implement improvements early on in the process. In short, we’ve vetted our solution before production, which gives us a higher likelihood of success in meeting people’s needs upon delivery.

Now, it’s your turn. Since you’re probably not headed to a mountain, we’ll use an approach that takes advantage of our profession’s current technologies. We’ll prototype a different mode of mobility with the shared goal of reducing impact on the environment. Your challenge will be to prototype a new electric car. You’ll begin by leveraging the impact on the environment. Your challenge will be to prototype a new electric car. You’ll begin by leveraging the first phases of the design thinking process: understand and explore. Then develop prototypes that communi-cate your concept’s design through sketches before bringing it to life with software to develop a 3D model. Finally, you’ll test and revise it based on feedback from your learnings. Our ultimate goal is to create quickly, get feedback from peers, teachers, and the defined audience so you can iterate the design. Remember, at this prototyping phase, you need to have the design criteria nailed down so you can begin prototyping with the right end goals in mind. Here are a few assignments to help you practice prototyping.

To accelerate your prototyping skills even further check out the many resources, projects, skills-based videos and other assets available on Design Academy.

Ready for the next step? Delve into the Refine Phase of Design Thinking.

Hands-on with Design Thinking: Explore Phase

This article is part of a series. Explore is #2 of 5.

RONSEN_BLOG_EXPLORE.pdf - Adobe Acrobat Pro DC.jpg

In this series, Michele Ronsen of Ronsen Consulting explores Design Thinking through blogs and activities. Before reading the article below, check out the first blog in the series, which covers the Understand phase of Design Thinking.

The design industry has gone through significant changes in roles and responsibilities over the past ten years. If you’ve been in the industry as an educator; it’s obvious. As a student, it may not be yet. The world is smaller than it was before, and technology and globalization have played a key role in bringing experiences to our hands. We as designers today have become more cross-functional in our scope, and expectations are high for the products and experiences we deliver. Design thinking has become a necessary piece of our process if we are to drive sustainable and positive change socially, economically, and behaviorally.

This blog series covers the five steps of Autodesk’s User-Centered Design and Design Thinking process for educators and practitioners—Understand, Explore, Prototype, Refine, and Solve—and includes several homework assignments for hands-on practice.

In our last post, we covered Understanding and learned how to implement practices of empathy in order to uncover and grasp people’s wants and needs. This foundational step sets the tone for our design process and ensures that we’re designing for impact.

DesignThinking_Icon.png

Our next step is to Explore. In this phase, we will take a look at how we approach potential design solutions. We need to go wide on explorations before we select directions to Prototype, which is a form of validating and testing. In the following posts, we will look at Refining directions so that we can ultimately arrive at a Solution for people’s needs.

Let’s zero in on Exploring, another key step to success.

This phase is about finding solutions to the problems we’ve uncovered. The goal here is to generate a wide range of ideas on how we might meet the needs of the people for whom we’re designing. Much like the ap- proach to Understand, there are both active and passive methods we might employ.

RONSEN_BLOG_EXPLORE.pdf - Adobe Acrobat Pro DC.jpg

Active, or primary, exploration is the direct application and expansion of one’s own ideas. Common active exercises include brainstorming (which could either be independent or collaborative), mind mapping, or soliciting ideas from others through interviews, surveys, intercepts, or other means. These can be done on your own or with your team, stakeholders, or people representing the users of your product or service.

For example, if you have come to the understanding that a major problem for people using a fitness center is dis- comfort, you might use a mind map to explore all the possible triggers for this. You might start with “gym dis- comfort” written at the center and branch into categories like facility layout, understanding of equipment, types of classes offered, internal dissatisfaction with self or progress, environmental factors like temperature and noise, or preconceived stigmas. With each branch, you can dive deeper into more specific variables that might be angling on the discomfort that causes people to avoid working out.

Passive, or secondary exploration methods include finding ideas others have already identified. These are usually done individually and can be found by searching online forums, published articles, interviews, and theses. There’s also always the possibility that someone has already conducted research on the topic that you are exploring; go out and find that. It’s worth mentioning that while your favorite search engine is your friend, do be sure to authenticate what you’ve found online.

RONSEN_BLOG_EXPLORE.pdf - Adobe Acrobat Pro DC.jpg

Here are four suggestions on how to explore and generate a wide range of ideas successfully.

First, identify your biases, and sideline them! By objectively exploring a given landscape, you will come up with a larger range of ideas and potentially better solutions than if you limit yourself.

Second, identify your assumptions and challenge them. Then challenge them again. It’s really easy to go with your instincts, and they can indeed be good starting points. However, unless you are a full representation of your audience, you need to get perspective beyond your own. Question what you believe to be true; it may not be in the given scenario.

Third, work quickly. The goal of generating ideas should never be to develop perfect solutions. The goal is to identify a range of initial thoughts and convey them clearly enough to demonstrate the intent. A common practice for brainstorming is to use sticky notes to document ideas. Each note is just enough space for a single word or sentence, which is just enough to quickly express and impress a thought.

RONSEN_BLOG_EXPLORE.pdf - Adobe Acrobat Pro DC.jpg

Fourth, there are no bad ideas! You may discount something, but remember to remove your biases and assumptions. Even the smallest or silliest of ideas may have merit. Give yourself and others permission to generate; creating an open environment always generates a larger quantity of ideas and better quality ones than a closed off one.

Okay, so we’ve got active and passive methods of exploration, and we know we need to identify our biases, challenge our assumptions, and work quickly. Can we push this any further?

Consider some of the following to layer onto your process:

  • Take something that already exists and change it incrementally.

  • Combine an existing idea with a new one.

  • Combine multiple ideas into buckets that are a new idea.

  • Turn the problem on its head; approach it from an entirely new perspective.

  • Throw all practicality and constraints out the window.

  • Follow the path of the least resistance.

  • Identify small, iterative ideas that eventually meet the need over time.

RONSEN_BLOG_EXPLORE.pdf - Adobe Acrobat Pro DC.jpg

Personally, I work both individually and with others to identify ideas, flesh them out, and identify the best con- tenders to move forward. Other people have valuable perspectives; whenever possible seek out their input. Sometimes just the exercise of talking through a concept with another person can be helpful in gauging if the concept is palpable or too ambiguous. Looking out for initial reactions and interpretations is not only helpful validation on an idea, but can sometimes lead to new ideas.

Again, always build in time to analyze and synthesize the ideas generated in this step of design thinking. Look for patterns and themes. Take a step back and look again. Be cautious of outliers. Look for obvious holes. Fully processed ideas will fare better in the next steps of the design thinking process.

Don't underestimate the importance of Exploring. Not developing a wide range of ideas, or including various perspectives could lead to big missed opportunities.

Now, let’s try it out.

Here are some exercises that will help you refine skills of Exploring. This assignment, together with the Autodesk Design Academy Help the Environment—Animated PSA project, will help you integrate design thinking as a framework that can be applied to any project. Animator Warren Fearn will walk you through his design process.

Use the assignment exercises to explore your design and get connected to a design community by posting and sharing your progress along the way.

Hands-on with Design Thinking: Understand Phase

This article is part of a series. Understand is #1 of 5.

RONSEN_BLOG_UNDERSTAND.pdf - Adobe Acrobat Pro DC.jpg

Design is a hot topic now and pops up in casual conversation all the time. The industry as a whole, and design education specifically, have experienced significant changes over the past decade. Former clear lines between creative disciplines have become blurry and some have disappeared. Technology and globalization have changed how we interact and communicate, and both demand and expectation are high for what the future holds.

A decade ago, designers and design educators were a select breed. We were artists; design was our game. Today, designers and design educators are less distinguishable, and we’re often proficient in not only design; our competencies and collaboration glide from business and marketing strategy to research to content strategy, and more.

We’re expert problem solvers, and we deliver high quality, end-to-end experiences for products and services. We hail from a variety of disciplines, even outside of design, and together we leverage cross-functional perspectives to excel and delight.

And guess what? Designers and design educators are in high demand. For those of you who have survived the broadening of this practice, I commend you. But even more credit to those of you who have adapted and have taken the initiative to learn the new skills required to excel as a designer or educator today.

RONSEN_BLOG_UNDERSTAND.pdf - Adobe Acrobat Pro DC.jpg

I’m a classically trained Graphic Designer. I’ve spent time in Creative Direction, and I’ve tackled User Experience and Product Design. I now lead my own Design & Strategy firm specialized in human-centered research and development. We offer full service and a la carte solutions that help businesses grow. We’ve learned from these years of design transition; we need to approach design differently. Design isn’t only about taking and solving the obvious problems and addressing them in a design silo; it’s about applying design thinking into the broader education and business environment. Empathy is the key. This is the new face of design.

In this blog series, I walk you through practical exercises of User Centered Design and Design Thinking processes that you can implement to refine your own processes. Use them as resources to integrate design thinking as a framework in the activities that follow and/or apply them to any project you choose. In combination with the many Design Academy resources these exercises are helpful for those new to Design Thinking and those wishing to refine their process.

This series covers the five steps of User Centered Design and the Design Thinking process. These steps— Under- stand, Explore, Prototype, Refine, and Solution—are not only what I use day-to-day, but also what I teach at the Academy of Art University and California College of the Arts in San Francisco. I truly believe this process is integral in exceeding the new expectations of design, for all of us. There is no better time than now to master these skills. Our commitment to these practices can drive sustainable, positive change —socially, economically, behaviorally, and more—on both small and large scales.

This series also includes several homework assignments for students of various levels and encourages hands-on practice. These assignments teach how to understand the people you’re designing for, how to generate ideas, how to prototype them, how to solicit feedback, and ultimately how to lead to innovate. They also help you build class interaction and peer-to-peer learning skills to foster a collaborative environment and the collaborative and interdisciplinary skills to succeed as a Design Thinker.

DesignThinking_Icon.png

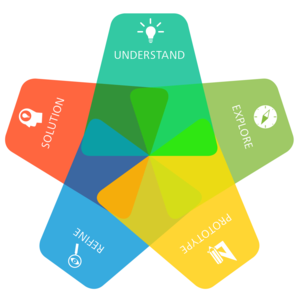
Let’s get to it. While there are various interpretations of the key steps in design thinking, Autodesk promotes the following: 

  1. Understand—Understanding involves learning about the problem and the intended audience by developing empathy to uncover people’s wants and needs.

  2.  Explore—Exploring is about generating a wide range of ideas on how we might meet the needs of the people for whom we’re designing.

  3. Prototype—Prototyping is a form of validating and testing (and iterating and testing again) to gather constructive and timely feedback at an early stage in order to apply learnings back into product or service improvements.

  4. Refine—Refining involves narrowing your ideas down to one and making final refinements.

  5. Solution—Solutions entail building, printing, or presenting the finished project.


Understanding the people you’re designing for—the ones who will use your products and services—is the crucial first step. We call them “users,” but let’s be honest: they’re people. Developing empathy for people is not only a pillar of design thinking, but essential throughout the whole process. We must uncover people’s true wants and needs in order to understand and frame the problem we’re solving. By placing people at the forefront of our approach, and by removing our own bias, we unearth the learnings that will guide our process. Understanding encompasses the study of these people, the empathy we develop, and the findings that emerge. This is the most foundational and important phase of this methodology. Design thinking does not start with a problem or a solution. It is implementing this preliminary step that truly differentiates design thinking from a traditional design approach.

RONSEN_BLOG_UNDERSTAND.pdf - Adobe Acrobat Pro DC.jpg

Pretty basic, right? It’s putting people first so we can learn about their needs and expose problems we can solve through design. But how?

There are many methods to gain this understanding, both active and passive. Passive approaches might include artifact analyses and simple observation. Active approaches could include interviews, diary studies, or card sorting.

Let’s take a look at an example from each of these. Let’s say you’ve been hired to design chairs for toddlers. You might employ simple observation, a passive method. You might learn that a challenge faced by young ones in moving from surface to surface is affected by height or slope. You might learn that stability is a key factor in reducing falls. You might learn that color affects delight. You also could take an active approach. Perhaps you interview mothers of toddlers to understand their pain points for chairs, and learn that being easily cleaned is of utmost importance, or that growing as the child does would be a nice to have.

RONSEN_BLOG_UNDERSTAND.pdf - Adobe Acrobat Pro DC.jpg

A combination of approaches is usually the most reliable, but isn’t always possible due to time, geography, budget, or general resources. Let’s say you’re studying how people use cash cards in Europe, but your budget doesn’t include a trip to Europe. While you might not be able to do artifact analyses, such as studying cash machines used in London, you might be able to interview people who have used them on a regular basis.

Whatever approach or approaches you employ, it’s essential that you take the mass of information and data you’ve collected and take the time to analyze it. Look for patterns and themes. Take a step back and look again. Be cautious of outliers. Findings are nothing without synthesis.

Understanding is the most foundational phase of the five. It might be tempting to skip this phase if you think you already have a general understanding, but remember that our own biases and assumptions are quick to get in the way of empathy. If we don’t take time to be thorough in this crucial phase, we run the risk of taking a turn that leads the entire design process in the wrong direction. We want to uncover the most impactful wants and needs, and we will keep coming back to these in the next few steps.

RONSEN_BLOG_UNDERSTAND.pdf - Adobe Acrobat Pro DC.jpg

Now, let’s give this a whirl. In this design thinking assignment, the objective is to develop and refine skills in Understanding using the Autodesk Design Academy Chair-Ergonomics as the design project. This assignment, together with the featured project designer, Karim Rashid, and the project resources integrate design thinking as a framework that can be applied to any project regardless of the level of talent. They are also designed to connect you to the Design Academy community. We encourage you to post, share, and celebrate your progress along the way.